Authentication using Username and Email Address - Laravel 7


You want to provide an easier way for your users to login in your application. You can give them the ability to login using a username and email address.
Achieve this is quite simple. You need to have installed laravel auth ui.
How Install Auth UI
To install, just run:
composer require laravel/ui:^2.4
and then:
php artisan ui vue --auth
Now we have all we need to get started. First thing to do, is update our database so it can store the username.
Database Setup
Open create_users_table migration, and update it, to look like that:
Schema::create('users', function (Blueprint $table) {
    $table->id();
    $table->string('name');
    $table->string('username')->unique()->index();
    $table->string('email')->unique();
    $table->timestamp('email_verified_at')->nullable();
    $table->string('password');
    $table->rememberToken();
    $table->timestamps();
});
Refresh your database using:
php artisan migrate:refresh
We have successfully updated our database to store the username. Now we need to update our views and our controllers. First we will update our views.
Update Views
Now we need to update our views to allow registration using username and login using username.
Update Registration View
Add the username field on registration form:
<div class="form-group row">
    <label for="username" class="col-md-4 col-form-label text-md-right">{{ __('Username') }}</label>

    <div class="col-md-6">
        <input id="username" type="text" class="form-control @error('username') is-invalid @enderror" name="username" value="{{ old('username') }}" required autocomplete="username">

        @error('username')
            <span class="invalid-feedback" role="alert">
                <strong>{{ $message }}</strong>
            </span>
        @enderror
    </div>
</div>
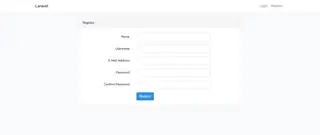
Our form now looks like this:
Update Login View
On our login view we will remove the email address field, and add a new one called identity.
<div class="form-group row">
    <label for="identity" class="col-md-4 col-form-label text-md-right">{{ __('Username or E-Mail Address') }}</label>

    <div class="col-md-6">
        <input id="identity" type="text" class="form-control @error('identity') is-invalid @enderror" name="identity" value="{{ old('identity') }}" required autocomplete="identity" autofocus>

        @error('identity')
            <span class="invalid-feedback" role="alert">
                <strong>{{ $message }}</strong>
            </span>
        @enderror
    </div>
</div>
Update the Controllers
Now that we updated our frontend, we just need configure our backend to allow the login using the username, and accept the registration field. Lets start by updating our User Model.
Update the User Model
So first of all, we need to update the user model to accept the username attribute on massive assignments.
/**
 * The attributes that are mass assignable.
 *
 * @var array
 */
protected $fillable = [
    'name', 'email', 'password', 'username',
];
Update Register Controller
On the RegisterController we will first update the registration validator, so it can validate the username. The username field is required, cannot be longer than 40 characters and must be unique on the users table:
'username' => ['required', 'string', 'max:40', 'unique:users']
At the end our validator should look like this:
/**
 * Get a validator for an incoming registration request.
 *
 * @param  array  $data
 * @return \Illuminate\Contracts\Validation\Validator
 */
protected function validator(array $data)
{
    if (isset($data['username'])) {
        $data['username'] = trim(strtolower($data['username']));
    }

    if (isset($data['email'])) {
        $data['email'] = trim(strtolower($data['email']));
    }

    return Validator::make($data, [
        'name' => ['required', 'string', 'max:255'],
        'username' => ['required', 'string', 'max:40', 'unique:users'],
        'email' => ['required', 'string', 'email', 'max:255', 'unique:users'],
        'password' => ['required', 'string', 'min:8', 'confirmed'],
    ]);
}
Now that we have configured our validation, we just need to update the create method, so it can save the username to the database. We will use trim to remove the spaces from the begging and end of the username and email field, and convert it to lowercase, before saving it to database.
/**
 * Create a new user instance after a valid registration.
 *
 * @param  array  $data
 * @return \App\User
 */
protected function create(array $data)
{
    return User::create([
        'name' => $data['name'],
        'email' => trim(strtolower($data['email'])),
        'username' => trim(strtolower($data['username'])),
        'password' => Hash::make($data['password']),
    ]);
}
Our application, now allows user registration using username. Lets also allow login using username and email address.
Update Login Controller
He arrived to the part that gives a little more work. Here we will have to override some methods.
First method we will be overriding is the username method, this method must return the database column name where to search for the identity field value.
/**
 * Get the login username to be used by the controller.
 *
 * @return string
 */
public function username()
{
    $login = request()->input('identity');

    $field = filter_var($login, FILTER_VALIDATE_EMAIL) ? 'email' : 'username';
    request()->merge([$field => $login]);

    return $field;
}
Explanation: We are getting the identity field value, then we check if the provided value is a valid email address, if it is, the field will be email, else will be username. Then we merge into the request, the field and the value.
Next we will validate the data provided:
/**
 * Validate the user login request.
 *
 * @param  \Illuminate\Http\Request  $request
 * @return void
 *
 * @throws \Illuminate\Validation\ValidationException
 */
protected function validateLogin(Request $request)
{
    $messages = [
        'identity.required' => 'Email or username cannot be empty!',
        'password.required' => 'Password cannot be empty',
    ];

    $request->validate([
        'identity' => ['required', 'string'],
        'password' => ['required', 'string'],
        'email' => ['string', 'exists:users'],
        'username' => ['string', 'exists:users'],
    ], $messages);
}
And this way we have successfully configured authentication using username and email address . You also can, only allow the login using the username, or just the email, it is totally up to you.